Showing posts with label T-shirt. Show all posts

Saturday, September 8, 2012

D.I.Y: Printed Onesie

Hey guys!

   So I thought I would share with you a neat little project that I did today. I screen printed on a onesie, but not really because I used a stencil I made out of contact paper rather then a silk screen. Anyways lets get started!!!

   Alright so the supplies you will need include:

  • Scissors
  • Tape
  • Exacto Knife
  • Cutting Board 
  • or if you have one of those neat Cricut machines you can skip the above supplies
  • Contact paper
  • Screen Printing Ink ( I used yudu, Lavender, because it was on sale at Michaels) 
  • Onesie or Shirt
  • Cardboard
  • and a squeegee type piece of plastic (mine came with my screen printing stuff,) it is really just a thin piece of plastic with a straight edge

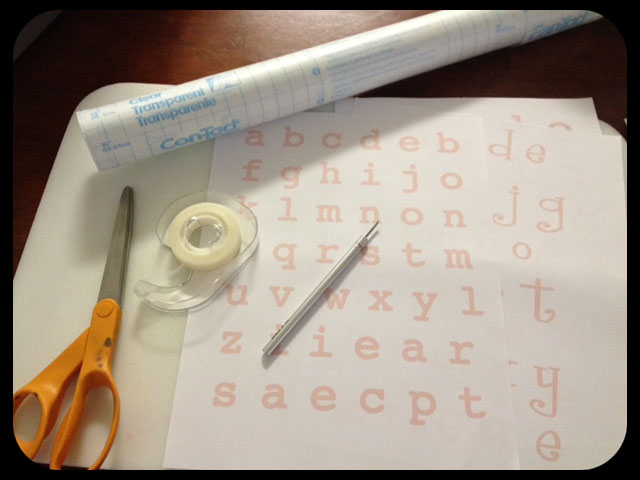
   So first I printed some letters to make the stencil. Then I taped the contact paper and the printed paper to my cutting board so that they would not move while I exacto knifed those letters :)


   Very carefully I traced the letters with the exacto knife and cut each one out. Now the important part of the letter to keep clean is the outside. (Not the part that is sticking out in the picture below)


See clean cut :)


   Now if you have one of those cool cutting machines then you don't have to do the above steps, and this is the part where I really envy you because cutting each letter out takes a while. Especially if you want to make them look pretty. Okay then you take apart the contact paper and place your letters on the onesie. 


Then put a few drops of your paint on the onesie...
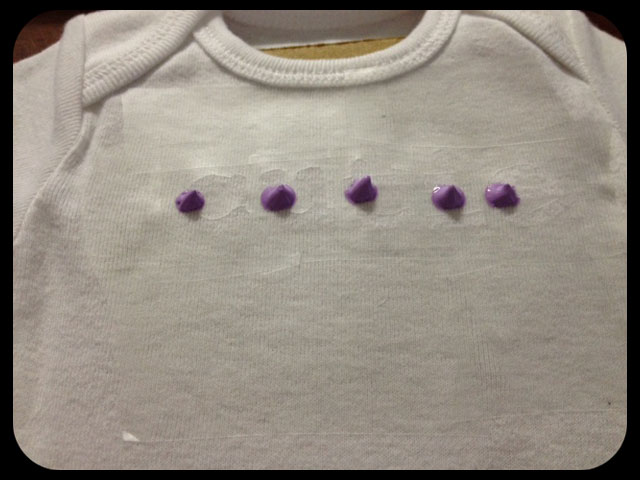

and squeegee away!


   Last leave the stencil on for an extra minute after you have administered the paint. This lets it dry abit so that it does not bleed once the stencil is off. Be very careful when pulling the contact paper off. 

Let it dry for like an hour or so and then place a towel over the image and use an iron to set the image.

And Tada!!


I also made this onesie:

This one was much easier to make because I did not have to make teenie tiny cuts for letter. 


Thursday, July 12, 2012

The Wizarding World of Harry Potter

   Hi! Everyone! 
    So I am freaking jumping out of my socks excited for this weekend!!!!! In fact I have been waiting for this weekend since I was 10 years old. From the very first time my teacher began reading Harry Potter and the Sorcerer's Stone I was hooked. This weekend I get to visit that magical place I have been dreaming of, The Wizarding World of Harry Potter. My Mom asked  "how have you been waiting for this since you were 10, the park just opened a couple years ago?" Well that was easy to answer. I have been imagining what Hogwarts would be like since fifth grade and now I get to go see the real thing , you know minus the actual magic. 
   Now I will be the first to tell you I am the biggest kid when it comes to Harry Potter. In fact in the last couple days my Mom has repeatedly said " you know you're gonna be a mommy pretty soon." Yes I know Mom and my child will love Harry Potter just as much as I do because seriously these stories are amazing. So in preparation for this weekend's adventures I made my self a couple things to go along with our trip. We (the family) are also having a Harry Potter Marathon as we speak (or write and read.) 
   First I made a shirt to wear. I used a simple print and iron on method. I used my Pottermore information to make my shirt. It has the House I was sorted into and all the qualities and what not on the front and my wand info on the back.  If you want to be Pottermore friends this is my user name: DustNox21331.


Second I made I wand. Yes I know I will be 23 next month and on to society a play wand is pretty childish but I still wanted one but I didn't want to spend outrageous money on one this weekend. I believe they cost like 30 bucks and that is just to much for a piece of brown plastic. So I thought hey I can make one (especially after seeing this.) I headed to Wal-Mart this afternoon and picked up my supplies:

  • Paint Brushes: $1
  • Glue Sticks: $2.97
  • Glue Gun:  $2.77
  • Wood Dowels: $.97
  • 2 Paints: $.57ea
  • Little Brown beads ( I didn't use them): $1.50
  • Yellow flower Beads : $1.00
  • Ruler: $1.00
               Total = 12.35
Now normally I would have had everything but the wood dowels, though in that case I would use a chopstick, but I am at my Mom's house and I don't have my beautiful craft closet at my finger tips. 


  Now first I measured out my dowel to be 10.5 inches and cut it with a pocket knife. I don't recommend this because it was difficult. Then I used my hot glue gun and covered the bottom of my "wand" to make the handle.


   Then I added the yellow rose bead I bought to the end to make it look pretty.


And last I painted it!


Tada!


I think it came out very nice :) 

  Well I am going to get back to watching Harry Potter!! I will share pictures about my visit to Harry Potter world next week!
Cheers!

Saturday, May 26, 2012

No Sew DIY Tank Top

    Wooohoooo! It is summer time. The air is hot, the BBQ pit is lit (ok not really) and the river is waiting. Tomorrow I am headed out to float the river and I am so excited! BUT, I don't want to go out in my swimsuit because I feel like I am in that stage of pregnancy where I look fat and not pregnant; so I decided to make a cover up thing. 

   So first I got one of my Dad's T-shirts:


   Then I cut the sleeves  and the collar off (I actually cut the collar several times after I was done until I was satisfied with how it looked.)


   Then I cut the sleeves into to three strips each ( I forgot to take pictures.) Next you are going to use a bottle of some sort to help you braid three of the strips together. 


Then you take one of the braids and loop it through the sleeves like so:

Keith says HI!

   And tie a knot. 
Turn it around so the knot is on the inside and TADA:


Pretty right?
At this point I tried it on several times and cut the collar as I saw fit.  I also tied each strap with a bit of left over t-shirt to make the sleeves thinner. 


And last I cut the bottom rim of the t-shirt so that it would be flowy. 

Here is the front:


And the back:


  I can't wait to wear it! I will post pictures of this top in action later! Cheers!